![]()
A Tiny Dashboard for Network UPS Tools


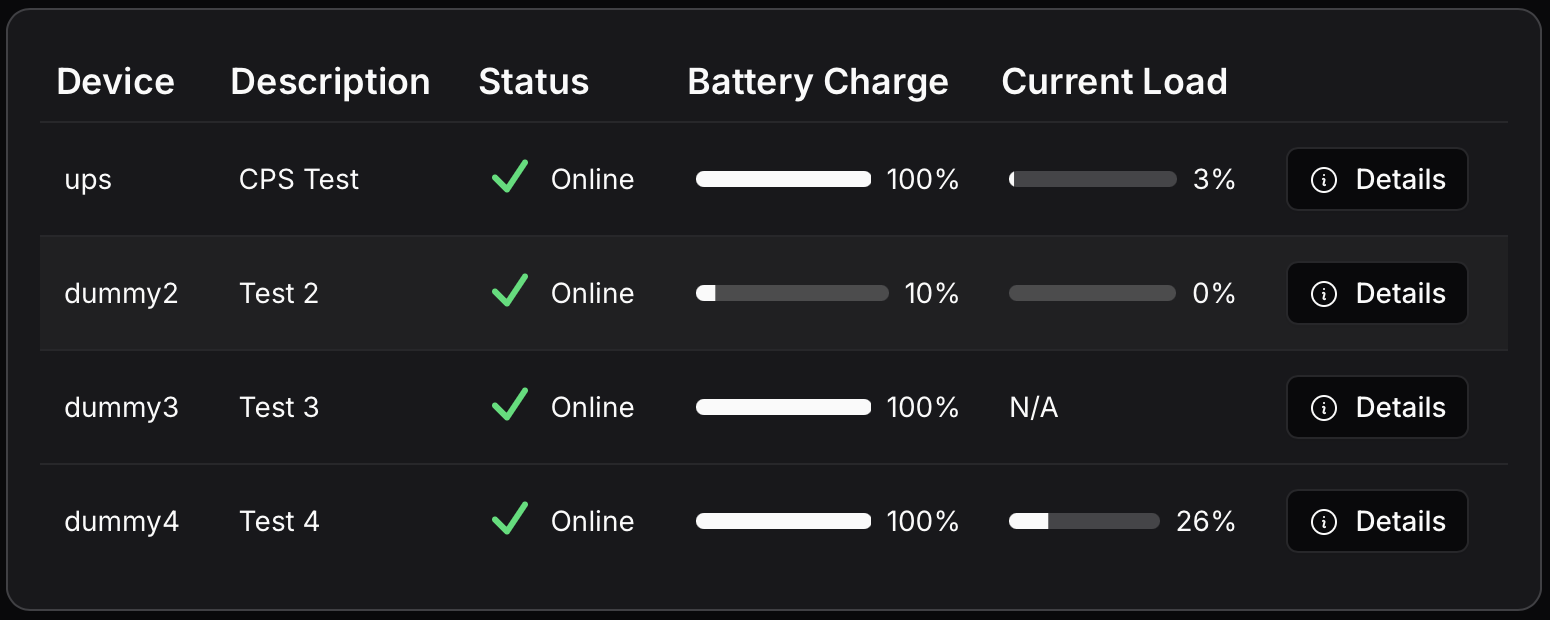
- Monitor UPS devices connected to your network via NUT
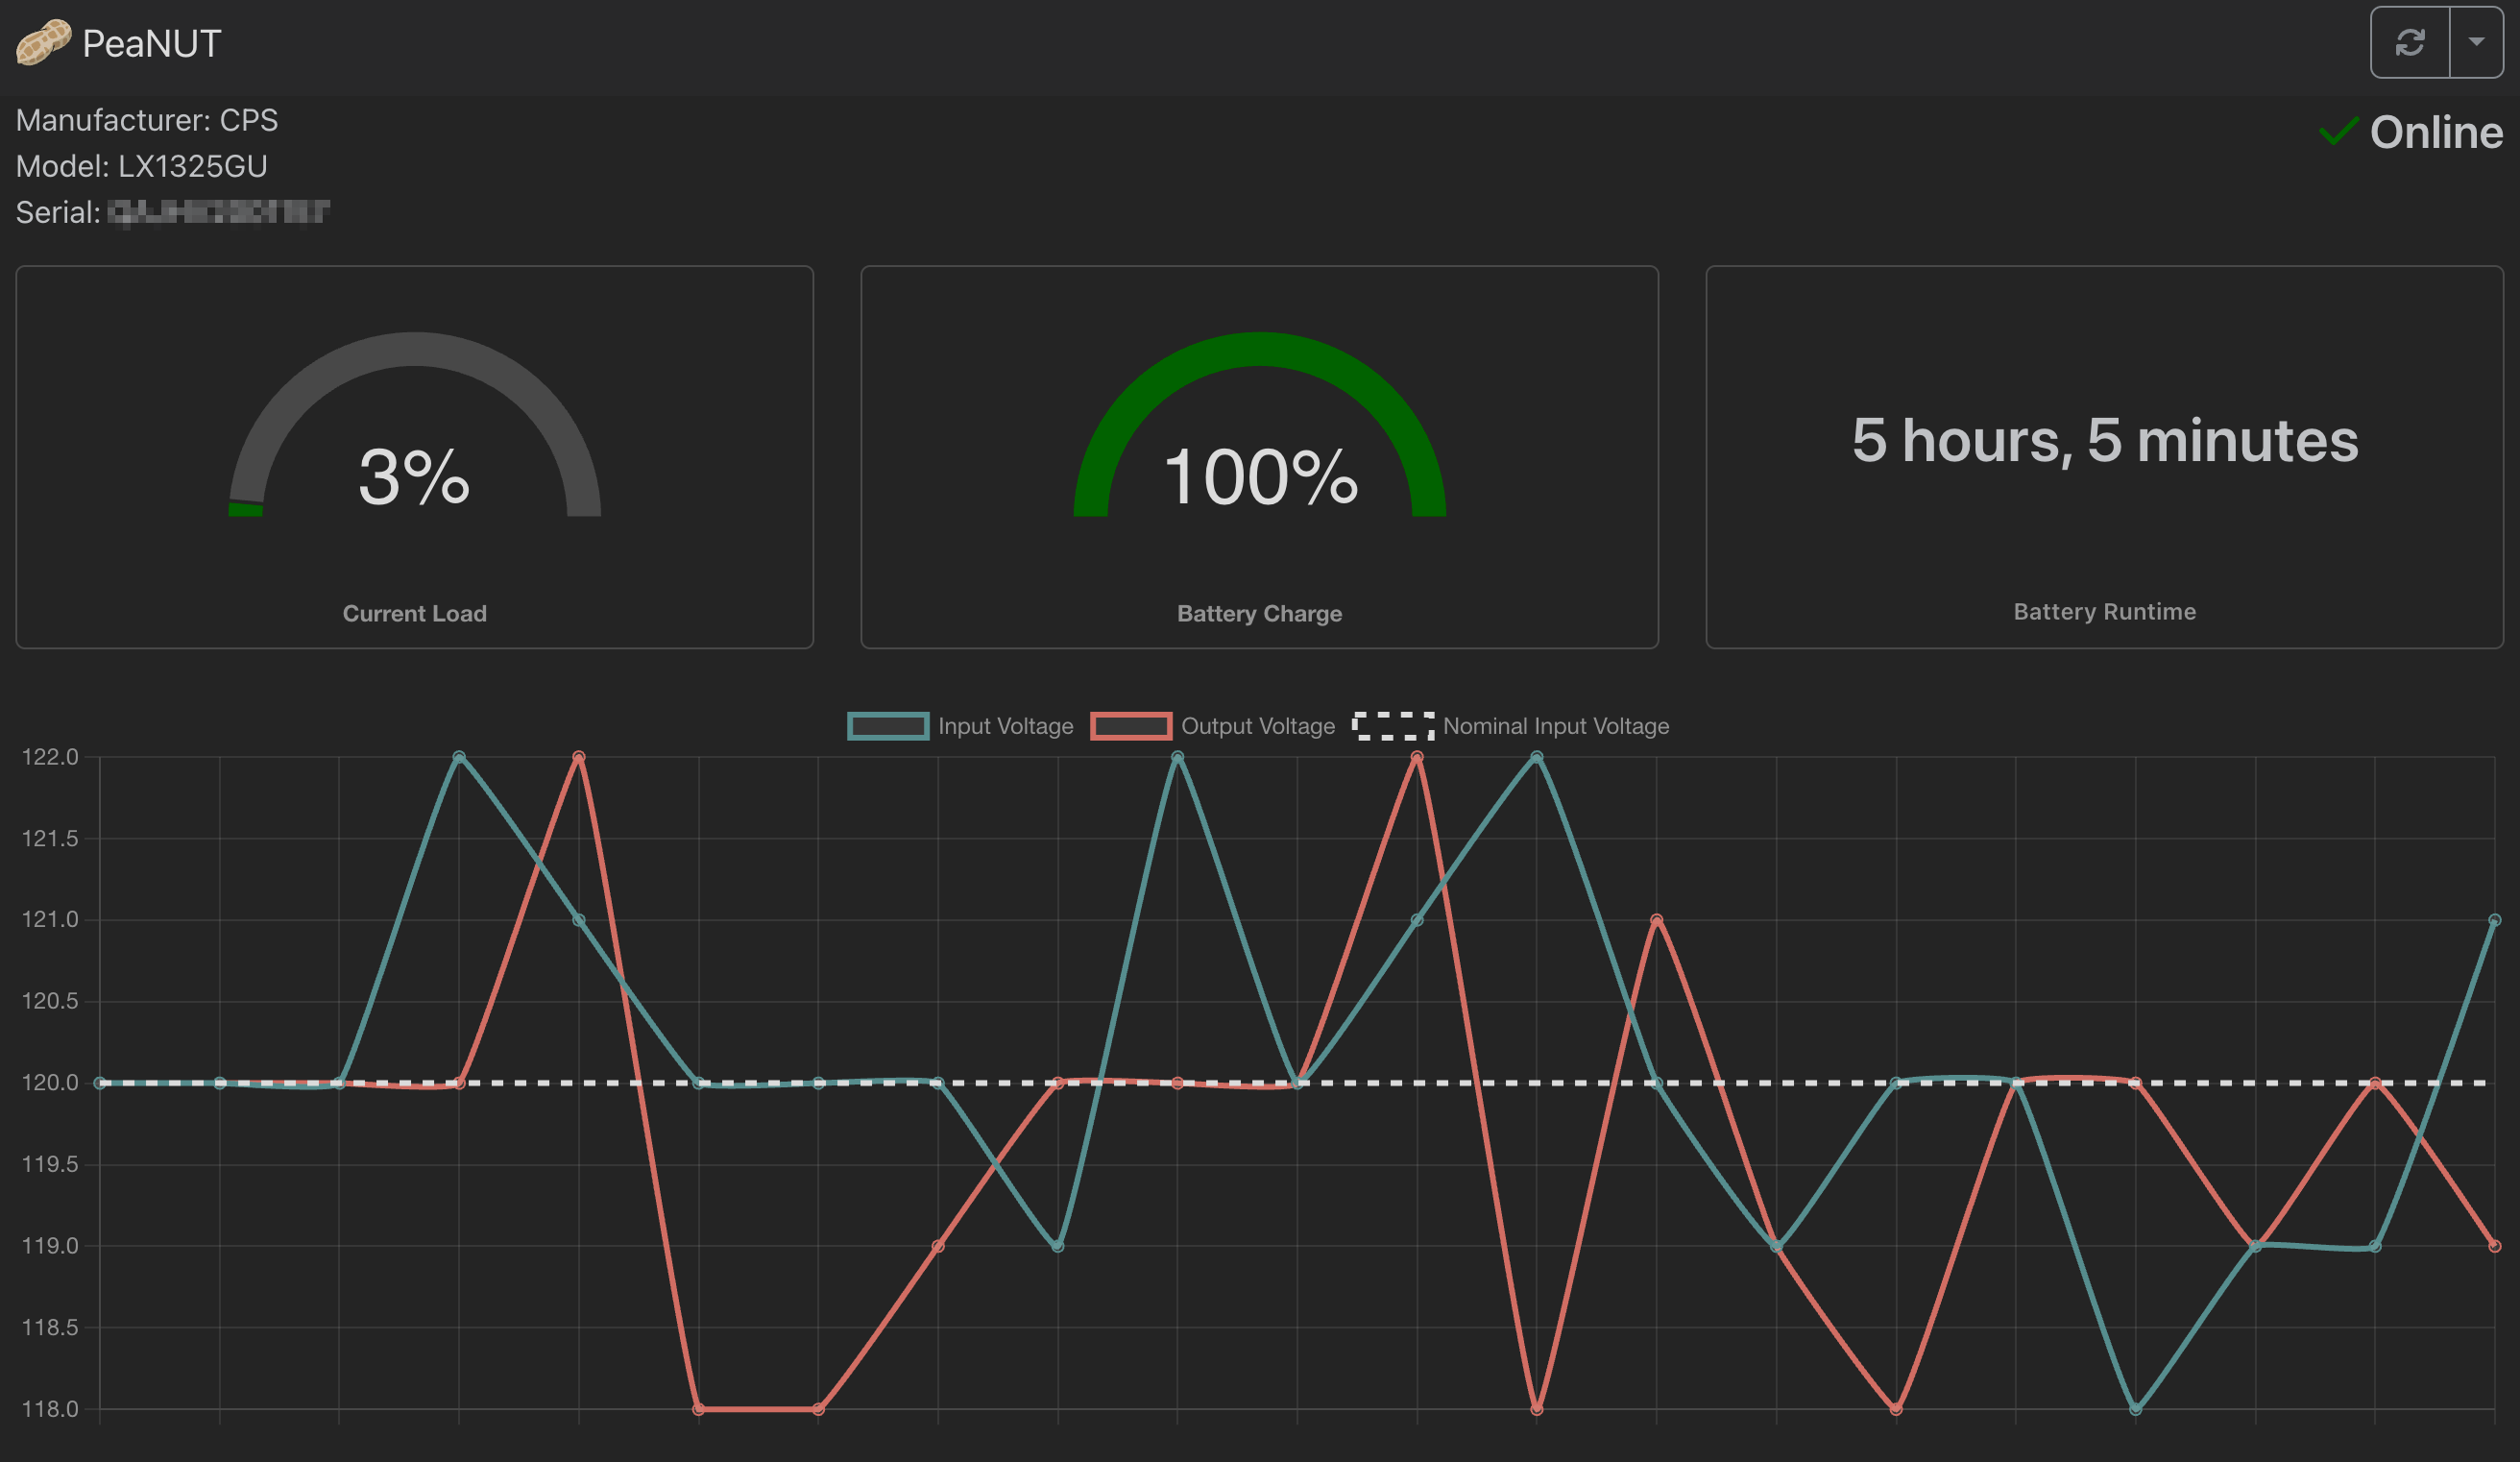
- View real-time statistics and status of UPS devices
- Customizable dashboard layout
- Supports multiple UPS devices
- Execute commands on UPS devices
- Configure settings through a user-friendly UI
- Manual configuration via YAML file
- Access NUT server directly via terminal
- API access for integration with other tools
- InfluxDB v2 integration for monitoring via Grafana
- Prometheus support for monitoring and alerting
- Customizable widgets for Homepage integration
- Detailed documentation and examples available
Install using Docker
docker run -v ${PWD}/config:/config -p 8080:8080 --restart unless-stopped \
--env WEB_PORT=8080 brandawg93/peanutservices:
peanut:
image: brandawg93/peanut:latest
container_name: PeaNUT
restart: unless-stopped
volumes:
- /path/to/config:/config
ports:
- 8080:8080
environment:
- WEB_PORT=8080git clone https://github.com/Brandawg93/PeaNUT.git
cd PeaNUT
npm i -g pnpm # only if you don't have pnpm installed
pnpm i
pnpm run build:local
pnpm run start:localMore examples can be found in the examples folder.
| Variable | Default | Description |
|---|---|---|
| WEB_HOST | localhost | Hostname of web server |
| WEB_PORT | 8080 | Port of web server |
| WEB_USERNAME | undefined | Username of web app |
| WEB_PASSWORD | undefined | Password of web app |
| BASE_PATH | undefined | Base path for reverse proxy |
| DISABLE_CONFIG_FILE | undefined | If set to 'true', disables all config file saving |
| DEBUG | false | Enable debug logging for server components |
For detailed reverse proxy configuration instructions, see the Reverse Proxy Setup Wiki.
Note: If you encounter issues with missing favicon or font loading errors, please check the troubleshooting section in the wiki for additional sub_filter rules.
Configuration is primarily done via the UI, but manual configuration can be done via the /config/settings.yml file within the container. More information can be found on the wiki.
Authentication can be enabled by setting both WEB_USERNAME and WEB_PASSWORD environment variables. When these are set:
- Web UI access will require login using these credentials
- API calls will require Basic Authentication
For API calls, you'll need to include an Authorization header with the Base64 encoded credentials in the format username:password. The header should be formatted as: Authorization: Basic <encoded credentials>
| API Call | Description |
|---|---|
GET /api/ping |
Health check endpoint that returns "pong" |
GET /api/v1/info |
Retrieves information about the PeaNUT application |
GET /api/v1/version |
Retrieves the version of the NUT server currently in use |
GET /api/v1/netversion |
Retrieves the version of the network protocol currently in use |
GET /api/v1/devices |
Retrieves information about all UPS devices |
GET /api/v1/devices/[ups] |
Retrieves information about the specified UPS device |
GET /api/v1/devices/[ups]/vars |
Retrieves all variables for the specified UPS device |
GET /api/v1/devices/[ups]/var/[param] |
Retrieves value for a single parameter of the specified UPS device |
POST /api/v1/devices/[ups]/var/[param] |
Saves value for a single parameter of the specified UPS device |
GET /api/v1/devices/[ups]/var/[param]/description |
Retrieves description for a single parameter of the specified UPS device |
GET /api/v1/devices/[ups]/var/[param]/type |
Retrieves type for a single parameter of the specified UPS device |
GET /api/v1/devices/[ups]/var/[param]/enum |
Retrieves enum values for a single parameter of the specified UPS device |
GET /api/v1/devices/[ups]/var/[param]/range |
Retrieves range values for a single parameter of the specified UPS device |
GET /api/v1/devices/[ups]/commands |
Retrieves available commands for the specified UPS device |
POST /api/v1/devices/[ups]/command/[command] |
Executes a given command for the specified UPS device |
GET /api/v1/devices/[ups]/command/[command]/description |
Retrieves description for a single command of the specified UPS device |
GET /api/v1/devices/[ups]/description |
Retrieves the description for the specified UPS device |
GET /api/v1/devices/[ups]/clients |
Retrieves the connected clients for the specified UPS device |
GET /api/v1/devices/[ups]/rwvars |
Retrieves writable variables for the specified UPS device |
GET /api/v1/metrics |
Metrics endpoint for prometheus |
GET /api/ws |
WebSocket endpoint for direct NUT server communication |
By default, API responses contain only values returned by the NUT server. You can opt-in to include PeaNUT-specific metadata by adding ?meta=true to requests.
-
When enabled for
GET /api/v1/devices, each device object will include:peanut.device_id: The NUT device identifier (UPS name)peanut.server: The NUT server host:port that provided the data
-
When enabled for
GET /api/v1/devices/[ups], the response will include the same fields.
For information about how to set up Homepage, check the Homepage docs.
Ex:
widget:
  type: peanut
  url: http://peanut.host.or.ip:port
  key: nameofyourups
Or use the customapi widget for complete customization!
Ex:
widget:
  type: customapi
  url: http://{HOSTNAME}:{PORT}/api/v1/devices/ups
  mappings:
    - field: battery.charge
      label: Battery Charge
      format: percent
    - field: battery.runtime
      label: Battery Runtime
      format: duration
    - field: ups.load
      label: UPS Load
      format: percent
    - field: ups.status
      label: UPS Status
      format: text
      remap:
        - value: OL
          to: Online
        - value: OB
          to: On Battery
        - value: LB
          to: Low Battery
        - any: true
to: UnknownQuestion: Chokidar is using lots of resources on my machine.
Answer: If you are using a Networked File Share, please see #142.
Question: Why can't I see multiple NUT devices on the display?
Answer: In order for PeaNUT to display multiple NUT devices, each UPS must have a unique identifier in the corresponding NUT configuration file. Make sure each UPS device has a distinct name/identifier in your NUT configuration to avoid conflicts and ensure proper display of all devices.
A wiki has been compiled of tested UPS devices. Feel free to look there for your device or add your device to the list by submitting an issue with the tested device label.
This project was made with you in mind. If you would like to show your appreciation for its continued development, please consider sponsoring me on Github.